Batman: Arkham City
 |
|
| Developers | |
|---|---|
| Rocksteady Studios | |
| macOS (OS X) | Feral Interactive |
| Publishers | |
| Warner Bros. Interactive Entertainment | |
| OS X | Feral Interactive |
| Russia | 1C-SoftClub |
| Engines | |
| Unreal Engine 3 | |
| Release dates | |
| Windows | November 22, 2011 |
| macOS (OS X) | December 13, 2012 |
| Reception | |
| Metacritic | 91 |
| IGDB | 91 |
| Taxonomy | |
| Monetization | One-time game purchase |
| Modes | Singleplayer |
| Pacing | Real-time |
| Perspectives | Third-person |
| Controls | Direct control |
| Genres | Action, Adventure, Open world, Stealth |
| Art styles | Realistic |
| Themes | Contemporary |
| Series | Batman: Arkham |
| Batman: Arkham | |
|---|---|
| Subseries of Batman | |
| Batman: Arkham Asylum | 2009 |
| Batman: Arkham City | 2011 |
| Batman: Arkham Origins | 2013 |
| Batman: Arkham Origins Blackgate Deluxe Edition | 2014 |
| Batman: Arkham Knight | 2015 |
| Batman: Arkham VR | 2017 |
| Suicide Squad: Kill the Justice League | 2024 |
Warnings
- For Games for Windows - LIVE on Windows 8 or later, install the latest Games for Windows - LIVE software.
Batman: Arkham City is a singleplayer third-person action, adventure, open world and stealth game in the Batman: Arkham series.
General information
- Arkham Wiki
- Batman Wiki
- GOG.com Community Discussions for game series
- GOG.com Support Page
- OS X minisite
- Steam Community Discussions
Availability
| Source | DRM | Notes | Keys | OS |
|---|---|---|---|---|
| Retail | SecuROM 8 and Games for Windows - LIVE DRM.[Note 1] The standard edition has 2 DVDs while the Game of the Year edition has 3 DVDs. | |||
| Retail | 2014 rerelease of GOTY edition. | |||
| Epic Games Store | Game of the Year Edition. DRM-free when launched directly from executable.[1] |
|||
| GamersGate | Game of the Year Edition. | |||
| Game of the Year Edition. | ||||
| GOG.com | Game of the Year Edition. | |||
| Green Man Gaming | Game of the Year Edition. | |||
| Humble Store | Game of the Year Edition. | |||
| Steam | Game of the Year Edition. Link for free demo: steam://install/200240 |
|||
| Developer website (unavailable) | Game of the Year Edition. | |||
| Games for Windows Marketplace (unavailable) | SecuROM PA DRM.[2] | |||
| Mac App Store (unavailable) | Game of the Year Edition. | |||
| Origin (unavailable) | Game of the Year Edition. |
- The retail version activates on Steam.[3]
- SecuROM PA and Games for Windows - LIVE DRM were removed from the Steam version in 2013.[3]
- The non-Steam OS X version uses Feral Interactive's DRM which requires online activation on their website.
- The non-GOTY version upgrades to GOTY when activated on Steam.[3]
Essential improvements
Skip intro videos
| Delete or rename video files[4] |
|---|
|
| Toggle the Startup Movies off through the Arkham City Advanced Launcher[citation needed] |
|---|
Arkham City Advanced Launcher
- This custom launcher replaces the original one and includes all the features from the vanilla launcher along with common tweaks and bug fixes already covered on this page and more. Also supports more advanced tweaks to improve performance and visual fidelity beyond what the vanilla launcher allows.
- Supports Steam GOTY, Epic Games Store GOTY and GOG GOTY releases. GFWL version is not supported. Windows and native Linux are supported.
- A PCGamingWiki mirror of the launcher binary is available
Game data
- A well-written post on the Steam Users' Forums about the way the game handles save data. Note that this forum post is only relevant to the deprecated GFWL version.
Configuration file(s) location
| System | Location |
|---|---|
| Windows | %USERPROFILE%\Documents\WB Games\Batman Arkham City GOTY\BmGame\Config\ |
| macOS (OS X) | |
| Steam Play (Linux) | <Steam-folder>/steamapps/compatdata/200260/pfx/[Note 2] |
Save game data location
| System | Location |
|---|---|
| Windows | %USERPROFILE%\Documents\WB Games\Batman Arkham City GOTY\SaveData\ |
| Steam | <Steam-folder>\userdata\<user-id>\200260\ |
| Steam Play (Linux) | <Steam-folder>/steamapps/compatdata/200260/pfx/[Note 2] |
- Steam saves are compatible with the GOG.com version.[5]
Save game cloud syncing
| System | Native | Notes |
|---|---|---|
| Epic Games Launcher | ||
| GOG Galaxy | ||
| Origin | ||
| OneDrive | Requires enabling backup of the Documents folder in OneDrive on all computers. | |
| Steam Cloud | Approx. 954 MB available. |
Convert GFWL savegames to Steamworks
| Use GFWL-stripper |
|---|
Convert Xbox 360 save games to Epic Games Store version
- This is a bit more involved and manual than removing GFWL above, but still easy.
0xrefers to hexadecimal values. For example,0x10means "the hexadecimal value 10 (decimal 16), not decimal 10".
| Instructions |
|---|
|
Convert Steam save games to Epic Games Store version
| Instructions |
|---|
|
Convert Epic Games Store save games to Steam
| Instructions |
|---|
|
Video
| Graphics feature | State | WSGF | Notes |
|---|---|---|---|
| Widescreen resolution | |||
| Multi-monitor | Multi-monitor HUD: Position Affects Gameplay.[6] | ||
| Ultra-widescreen | Some cutscenes are pillar-boxed. | ||
| 4K Ultra HD | |||
| Field of view (FOV) | See Field of view (FOV). | ||
| Windowed | |||
| Borderless fullscreen windowed | See the glossary page for potential workarounds. | ||
| Anisotropic filtering (AF) | Default is 4x ("MaxAnisotropy=4"), See Anisotropic filtering (AF). | ||
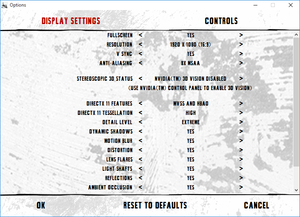
| Anti-aliasing (AA) | FXAA or up to 8x MSAA. | ||
| Vertical sync (Vsync) | |||
| 60 FPS | |||
| 120+ FPS | See 120+ FPS. | ||
| High dynamic range display (HDR) | See the glossary page for potential alternatives. | ||
Field of view (FOV)
| Change FOV[7] |
|---|
The result: Notes
|
Anisotropic filtering (AF)
| Anisotropic filtering (AF)[8][citation needed] |
|---|
|
120+ FPS
| Change Framerate[9] |
|---|
AND
--- Now both files should contain:
|
Input
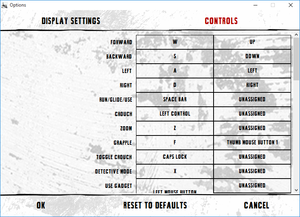
| Keyboard and mouse | State | Notes |
|---|---|---|
| Remapping | ||
| Mouse acceleration | See Disable mouse smoothing. | |
| Mouse sensitivity | See Mouse sensitivity. | |
| Mouse input in menus | ||
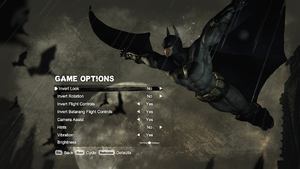
| Mouse Y-axis inversion | Separate inversion of look, rotation, flight controls and Batarang flight controls. | |
| Controller | ||
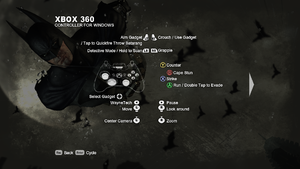
| Controller support | XInput supported, DirectInput has some mapping issues. | |
| Full controller support | ||
| Controller remapping | See the glossary page for potential workarounds. | |
| Controller sensitivity | ||
| Controller Y-axis inversion |
| Controller types |
|---|
| XInput-compatible controllers | ||
|---|---|---|
| Xbox button prompts | ||
| Impulse Trigger vibration |
| DualShock 4 controllers | ||
|---|---|---|
| DualShock button prompts | Use this mod. | |
| Light bar support | ||
| Connection modes | unknown | |
| Generic/other controllers |
|---|
| Additional information | ||
|---|---|---|
| Controller hotplugging | ||
| Haptic feedback | ||
| Simultaneous controller+KB/M |
Disable Mouse Smoothing
| Disable Mouse Smoothing[10] |
|---|
|
Mouse sensitivity
| Change Mouse sensitivity[citation needed] |
|---|
|
Mouse cursor reappears when using controller
- When using a controller, entering menus (such as the map) un-hides the mouse cursor and positions it in the center of the screen.
| Use AutoHideMouseCursor set to "Classic strategy"[11] |
|---|
Audio
| Audio feature | State | Notes |
|---|---|---|
| Separate volume controls | SFX, Music and Dialogue. | |
| Surround sound | Auto configures up to 5.1 output[12] | |
| Subtitles | ||
| Closed captions | ||
| Mute on focus lost |
Localizations
| Language | UI | Audio | Sub | Notes |
|---|---|---|---|---|
| English | ||||
| Japanese | Fan Translation https://kakihey.com/pc-gaming/batman-arkham-city-japanese/ | |||
| Arabic | Fan translation by AR Team, download. | |||
| Czech | Fan translation. | |||
| French | ||||
| German | ||||
| Hungarian | Fan translation. | |||
| Italian | ||||
| Polish | ||||
| Brazilian Portuguese | ||||
| Russian | ||||
| Spanish | Depends on Windows Language preferences, for Spain must be on any configuration of Spanish. | |||
| Latin American Spanish | Depends on Windows Language preferences, for Latin America, Windows language must be on Español (México), For configure through UserEngine.ini, change ESN to ESM. | |||
| Turkish | Fan translation. |
Change language
- By default the Windows system language takes over other preferences.
| Change game language[13] |
|---|
Notes
|
VR support
| 3D modes | State | GG3D | Notes | |
|---|---|---|---|---|
| Native 3D | ||||
| Nvidia 3D Vision | ||||
| TriDef 3D | DirectX 9 only. | |||
| iZ3D | ||||
| vorpX | G3D Officially supported game, see official vorpx game list. |
|||
Issues fixed
Fix Catwoman's Quickfire Disarm key missing on keyboard
- Although it is possible to do Catwoman's "Quickfire Disarm" with a gamepad, this move is made unavailable with a keyboard after unlocking the Caltrops as the Quickfire Caltrops move (double tap "2") replaces the Quickfire Disarm (the only way to do a disarm then being first selecting the whip then holding the left mouse button and clicking the middle mouse button, which might lead to broken combos). Note that the Quickfire Disarm is a different move from the Quickfire Trip (double tap "1").
| Edit BmInput.ini and UserInput.ini[citation needed] |
|---|
|
| Set the Catwoman Disarm Fix key remap to key of choice through Arkham City Advanced Launcher[citation needed] |
|---|
DirectX 11 lighting bug
| Replace graphics cache files from GFWL version[14] |
|---|
|
| Use the Arkham City Advanced Launcher[citation needed] |
|---|
|
Game crashes during introductory cutscene
| Install PhysX or disable it[citation needed] |
|---|
Storyteller achievement not unlocking
- The game only tracked 10 years from launch so 2021 and further will be bugged.
| Set the date of your PC to any date before year 2021[citation needed] |
|---|
Massive stuttering
- Running the game from a conventional HDD causes extreme stuttering when traversing the map due to loading. Moving the game to an SSD may fix this issue.
| Move or reinstall the game to an SSD |
|---|
Other information
API
| Technical specs | Supported | Notes |
|---|---|---|
| Direct3D | 9.0c, 11 | |
| Metal support | macOS >= 10.14 only | |
| Shader Model support | 3, 5 |
| Executable | 32-bit | 64-bit | Notes |
|---|---|---|---|
| Windows | |||
| macOS (OS X) | macOS only.[15] |
Middleware
| Middleware | Notes | |
|---|---|---|
| Physics | PhysX | |
| Audio | Wwise | |
| Cutscenes | Bink Video |
Center Main Camera View
By default the game's main third-person camera view is off-center (i.e. the character stands at the left side of the screen). For those who prefer the character to be central to the screen, the camera position can be changed via an in-game console command.
| Center Camera View[16] |
|---|
|
To simplify this process, you can bind this command to a hotkey.
| Center Camera View via hotkey[16] |
|---|
Notes
|
System requirements
| Windows | ||
|---|---|---|
| Minimum | Recommended | |
| Operating system (OS) | XP | Vista, 7, 8 |
| Processor (CPU) | AMD Athlon X2 4800+ Intel Core 2 Duo 2.4 GHz |
2.5 GHz Dual Core |
| System memory (RAM) | 2 GB | 4 GB |
| Hard disk drive (HDD) | 17 GB | |
| Video card (GPU) | ATI Radeon HD 3850 Nvidia GeForce 8800 GT 512 MB of VRAM DirectX 9.0c compatible | AMD Radeon HD 6970 Nvidia GeForce GTX 570 DirectX 11 compatible |
| macOS (OS X) | ||
|---|---|---|
| Minimum | Recommended | |
| Operating system (OS) | 10.14 | |
| Processor (CPU) | Intel 2.0 GHz | Intel 2.4 GHz |
| System memory (RAM) | 4 GB | 8 GB |
| Hard disk drive (HDD) | 16 GB | |
| Video card (GPU) | 512 MB of VRAM | 512 MB of VRAM |
- Users with macOS versions prior to 10.14 can select the branch
mac_retail_11 - macOS 10.13.6 or older onlyfrom the Beta tab on Steam. This enables the game to run with the legacy OpenGL backend on macOS >= 10.9.5.
Notes
- ↑ Games for Windows - LIVE DRM features: SSA+ZDPP activation, supports local profiles.
- ↑ 2.0 2.1 File/folder structure within this directory reflects the path(s) listed for Windows and/or Steam game data (use Wine regedit to access Windows registry paths). Games with Steam Cloud support may store data in
~/.steam/steam/userdata/<user-id>/200260/in addition to or instead of this directory. The app ID (200260) may differ in some cases. Treat backslashes as forward slashes. See the glossary page for details.
References
- ↑ Verified by User:Baronsmoki on 2019-09-19
- ↑ Microsoft Games for Windows Marketplace - last accessed on 21 August 2022
- ↑ 3.0 3.1 3.2 Steam Community :: Group Announcements :: Batman: Arkham City GOTY
- ↑ Skip 10 seconds of intro - last accessed on 2020-11-16
- ↑ Verified by User:Hman360 on 2020-12-12
- ↑ Batman Arkham City | WSGF
- ↑ B-AC - FoV Setting? - Steam Users' Forums (retrieved)
- ↑ Verified by User:Aaronth07 on 2018-03-13
- ↑ How to unlock max fps for Arkham City - overclock.net - last accessed on May 2023
- ↑ Verified by User:Aaronth07 on 2018-3-13
- ↑ Steam Discussions: Batman: Arkham City GOTY - Any way to get rid of the mouse cursor? - last accessed on 2021-02-01
- ↑ PC Gaming Surround Sound Round-up - last accessed on May 2023
- ↑ How to change the language in Batman Arkham City - Steam Users' Forums How do I change the language of Batman: Arkham City from the Epic Games Store?
- ↑ Steam Discussions: Batman: Arkham City GOTY DX11 lighting bug - last accessed on 2021-01-14
- ↑ Feral Interactive - last accessed on May 2023
- ↑ 16.0 16.1 Reddit /r/BatmanArkham Any way to change the camera to centred view in Arkham City?
- ↑ Reddit /r/BatmanArkham Making console commands permanent? - last accessed on May 2023

